
Shawl Every Day 2021
This my 6th year participating in a project I call Shawl Every Day where I wear a different shawl or cowl every day until I run out. In previous years, I have posted along with a theme such as mental health or featuring local businesses. This year I will be sharing various tips, tricks and knowledge about all things crafting and making, along with sharing some of my favorite makers out there. If there’s anything you want to learn about, feel free to let me know! You can also view all the posts on my blog under tag shawleveryday2021.
Day 1 - Oct 25 - Intro

The first thing I want to share is some encouragement. I often hear from people “wow, I could never do that.” And I feel like that sentiment sells people short. At some point, I didn’t know how to do all the things I do today. But I took a stab at it and learned something new and figured things out along the way. With the wealth of tutorials on YouTube and the internet in general, it’s easier than ever to learn a new skill. It just takes the courage to say “Sure, I’ll give it a try.”
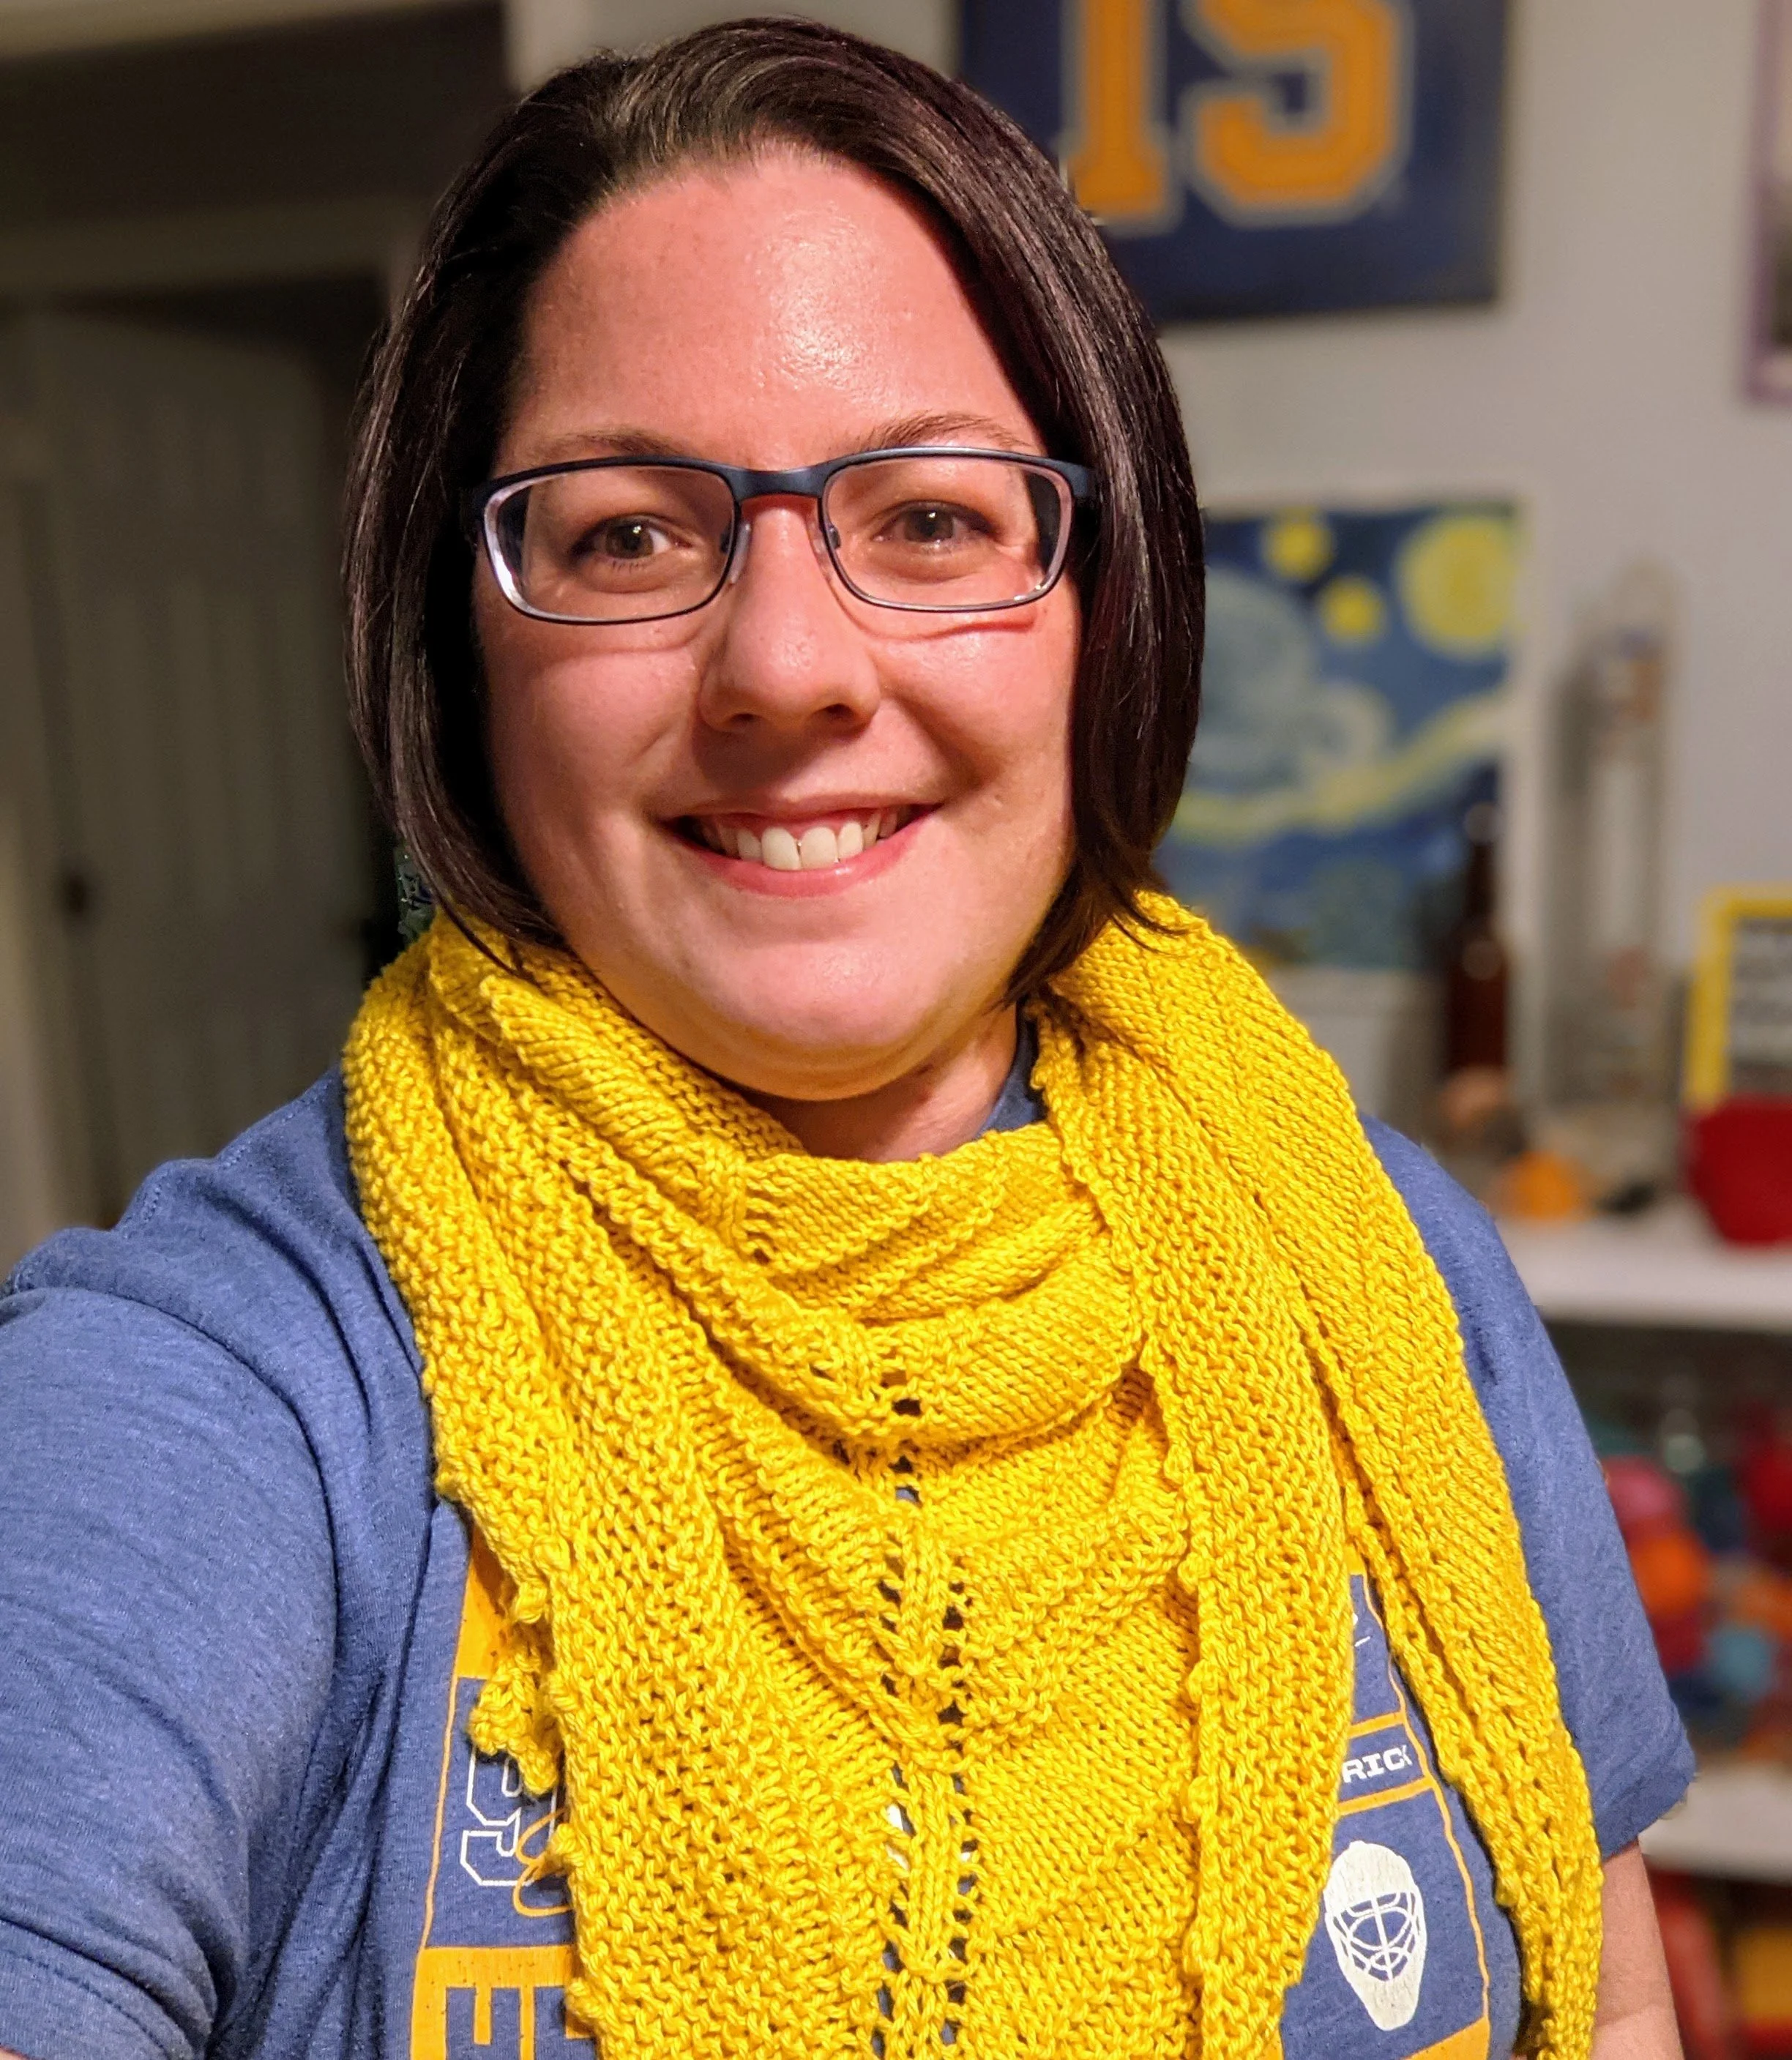
Shawl is Ginkgo Shoulderette Shawl by Maggie Magali

A tool that I think should be in every maker/crafter space is a digital kitchen scale. The two things I use it for most is to 1) weigh yarn and 2) weigh my filament spools.
If I have a partial skein of yarn, I can weigh it and figure out how many yards I have left. In my example, a full skein of that yarn weighs 100 grams and has 340 yards. My partial skein of yarn is 19 grams, so doing the math (19g x 340yds / 100g) means I have about 64 yards left. This will help me figure out if I have enough yarn for a project.
3D printing filament typically comes in 1000g spools, but there’s no easy way to weight just the filament to see how much you have left, like the yarn. Instead I weigh the entire spool when I receive it, subtract 1000g, and mark how much the plastic spool itself weighs. Then later, I can subtract that amount from the weight I have left to see how much actual filament I have.
The scale I use is from OXO, but any simple digital scale that can measure grams will be fine.
Cowl pattern is Vortex Cowl by Janina Böttger.

I do both knitting and crochet and a lot of people have a hard time telling the difference between the two, so here’s a brief overview.
Knitting
Knitting tends to be more flat and smooth. The most common stitch (the knit stich) has a characteristic V shape to it. Garter stitch is a common knitting pattern that looks like horizontal ridges. In the shawl I am wearing you can see the garter ridges on the bottom edge, so you know it is a knit shawl.
Crochet
Crochet items tend to be a little bulkier and the stitches have more texture to them. The most common stitch (double crochet in US terms) is very vertical and has a characteristic wrap around the center. Crochet is also commonly used to make toys and plushies, also called amigurumi.
Shawl pattern is Pirate’s Cove by Hilary Latimer.

I keep a variety of scissors in my studio and use them for different purposes.
The small pair on the top left lives at my computer desk and I use it mainly for trimming threads and yarn ends. It’s also the pair that travels with me if I need to pack a light craft bag. The pair on the top right sits at my sewing machine and I use it to cut any needed threads there. The pink pair is for paper only and lives in a ceramic holder with my pends and pencils.
The orange pair on the left lives in a ceramic holder on my sewing machine table along with random tools like my fabric marking pen, seam roller, and pinking shears. It’s just for general use, like cutting cardboard, light plastic, or anything else that I wouldn’t want to use other scissors for. The orange pair on the right is sturdier and I only use it to cut filament for my 3D printer.
And lastly is my fabric scissors, which live in a fabric case I custom sewed for them. :)
How many pairs of scissors do you keep in your shop?
Shawl pattern is Milena by Lisa Hannes

Half square triangles (or HSTs) are a common block element in quilting. It’s a pretty straightforward block where the seam runs diagonally across the block to cut the square into 2 different triangles. There are several ways to make them in bulk, such as 2-at-a-time, 4-at-a-time, 8-at-a-time, or I’ve even seen 12-at-a-time.
My current favorite method is the 4-at-a-time method because it puts the seam on the straight grain rather than on the bias, so it is less likely to distort. You do end up having to do a lot of trimming, but the end result is very neat and precise.
Shawl pattern is Dichotomy by Marjorie Dussaud

3D printers have been around for several years, but a lot of people still aren’t sure what they’re all about. I’ve been printing for 3 years and the biggest confusing people have is the difference between just 3D printing and 3D modeling.
I like to think of 3D printing as making a discrete instance of a thing. I didn’t design the thing, I’m just printing it. I download a model to my computer, and use a piece of software to translate the model into instructions that the printer can understand. The printer does its thing and I end up with the finished product.
3D modeling is the process of creating that design. Some people design from scratch using a CAD program or simpler ones that can make basic shapes and merge them together. Some people also use a 3D scanner to get the information about an existing object, so they can take that model and turn it into instructions for a 3D printer.
I liken it to a knitting pattern. I didn’t create the design, I am just following the instructions the designer wrote to make a discrete instance of the design.
So when someone asks, can you print this? Well, it depends on if a model already exists out there, because in general, I’m not able to create the model itself.
Scarf pattern is Stripes, Stripes, & Stripes Scarf by Sybil R

Knitting uses a lot of specific words and phrases, so here’s a round up of some of the common ones you might see or hear.
knit - usually a verb to describe the act of knitting, but it’s also the name of the main stitch used, i.e., the knit stitch
purl - sort of the opposite of a knit, it’s like working a knit stitch backwards so that it looks like a knit stitch from the back
knit flat - this means the item is worked back and forth in rows, typically on straight needles or circular needles just for length
in the round - the means the item is worked in a spiral to create a tube, typically on circular needles or double pointed needles
colorwork - this refers to patterns that use more than one color, such as the cowl I am wearing today. It can be done with multiple colors per row such as with fair isle or intarsia, or just one color per row in a technique called mosaic knitting
cast on - to start your knitting
cast off/bind off - to end your knitting
ribbing - alternating between knits and purls (typically either knit 1/purl 1 or knit 2/purl 2) will create a stretchy edging, such as for hat brims, sock tops, or sleeve ends
blocking - a technique used after an item is finished to sort of relax the stitches and get them settled into place. This helps get the item to size and also evens out the stitches so they look nice.
Cowl pattern is Spooky Season by Jocelyn Tunney

I saw a question in one of the sewing groups I am in that asked “If you reduce the size of a pattern should you also reduce the seam allowance?” The short answer is “no”, but I thought I’d share the longer answer as well.
When you are reducing or enlarging a pattern, the goal is to change the finished size. If you change the cut size, you will end up changing the seam allowance as well, and in general you want to keep the seam allowance the same no matter what size the finished product is.
In this example, the seam allowance is 1/4” so if you reduce the finished size from 2” to 1” (50% reduction), the cut size should change to 1 1/4” and NOT 1 1/8”. On the other hand, if you increase the finished size from 2” to 3” (50% enlargement), the cut size is 3 1/4” and NOT 3 3/8”, In general, you want to make your adjustments to the FINISHED size, then add your seam allowance to get to the cut size.
Shawl pattern is Wrapped in Leaves by Alana Dakos


As a quilter, I have a lot of rulers. Of the 14 I keep in my studio, 9 are specific to quilting and they all serve different purposes. I use exclusively Creative Grids quilting rulers because they are sturdy, have good grips on the back, and are easy to read and measure from.
Top row from left:
6 1/2” x 24 1/2” - This is my largest ruler and the one I use to cut WOF (width of fabric) strips. Fabric is typically 40-44” wide and folded in half, so usually less than the 24 1/2” length of my ruler
Slim by Angela Walters - This is a free motion quilting specific ruler to make straight lines and basic curves
Middle row from left:
3 1/2” x 18 1/2” - This is my go-to ruler for larger cuts. It’s not so big as to not be maneuverable, but large enough for most cuts.
Portable flexible ruler - Easy to measure knitting or anything really. Goes up to 60”
Archie and Shorty by Angela Walters - More free motion quilting rulers
Bottom row, left:
10” x 10” - This big square ruler is great for squares (obviously), half square triangles, and for cutting things along both the side and top.
Row 3, middle:
My grandpa’s old folding ruler. Folds out to 72” and has a bonus 6” narrow diameter depth ruler
96” flexible ruler for things that the portable one is too short for
Row 4, middle:
2 1/2” x 6 1/2” - This is my go-to ruler for smaller cuts. I got it at Quilt Con in 2015 and it’s what got me hooked on Creative Grids.
Squiggy and Shelly - Two more free motion quilting rulers
Row 4 and 5, middle:
Standard metal 12” ruler for all sorts of regular measuring and drawing. It’s lightweight and has cork on the back for gripping
Longer 15” ruler for anything else
Shawl pattern is Litla Shoulder Warmer/Shawlette by Larissa Brown
Today I want to give a shoutout to quilter Sarah Ruiz. She is an engineer at NASA and incorporates a lot of science and space elements into her quilts. My favorite quilt of hers is her tribute to the Mars rovers: “Mars is the only known planet inhabited solely by robots”!
I own her Ribbons pattern, I have used her Shake and Bake pattern to make a soccer-themed quilt for my nephew, and I used the Triangles at Play pattern to make a Halloween quilt for the house.
Her blend of science and craft hits just the right notes for me and I love everything that she does. I hope you check out her work and follow her on Instagram for excellent making inspiration.
Shawl pattern is The Sunlight Shawl for Sad People by Sylvia McFadden

My hair stylist asked me last night when/how I learned to sew, and I had to think about it for awhile. I’m actually not really sure.
My grandma had a sewing machine in her bedroom that she used a lot, mostly to make clothes. My mom also used it a lot to make doll clothes and Halloween costumes. I don’t recall specifically either of them teaching me how to sew, but I’m sure they did.
This was long before YouTube was a thing, so I had to have been taught in person. There was no “home ec” style classes at either my grade school or high school. There may have been a class at the library, but I don’t recall. I’m sure I also read a lot of books about sewing and learned from patterns like McCall’s and Simplicity.
I did a lot of hand sewing, making clothes for my American Girl dolls. I made my first quilt in April 2001 when I was 16. I bought my first sewing machine at Walmart in college.
I’ve since made over 60 quilts, over 30 bags and pouches, at least 10 costumes, 9 pillows, and countless other things like baskets, covers, placemats, car seat blankets, cases, you name it.
Shawl pattern is Mimi Shawl by Mari Chiba. It was originally made for my mom, because her grandkids called her Mimi, and I think of her every time I wear it.

I recently helped get one of my friends into knitting. She's done some washcloths and hats and is ready to start her first baby blanket. She asked about what needles to get, and it got me thinking about how to purchase tools.
There are certainly many ways to buy tools, but I like Adam Savage's approach of "buy the tool you can afford and go from there". I now have a top-of-the-line interchangeable knitting needle set with every possibly needle size from 000 (1.5mm) to 15 (10mm) and every cable length from 16" to 60". But I didn't start there.
I started with a few straight needles that were free. Then I discovered circular needles and bought a couple in the sizes I used most. Then it was clear that I was knitting often enough that I would benefit from the investment of an interchangeable set. I went with a medium cost one from Knit Picks because it was what I could afford at the time. After a while, the set just wasn’t fitting my needs any more, so I upgraded to Chiaogoo.
It wouldn’t have made sense to start with the pro version without using the basic version first. When you start out, you’re never quite sure what features you like or what annoys you or what you actually use. Going with what you can afford will inform you as to what to buy next when it’s time.
Cowl pattern is The Peaceful People Cowl by Jennifer Berg

When I am following a chart for colorwork in knitting, I use a regular Crayola marker to cross off the row I just completed. They’re great because it’s easy to see which row I’m on and it’s still easy to see the stitches from the row below. This works a lot better for me than just putting a tick mark on the edge of the row and it’s much less fiddly than other kinds of chart helpers that use long magnets to indicate the row.
Shawl pattern is Aperture Shawl by Ambah O’Brien.

Gatekeeping is when someone takes it upon themselves to decide who does or does not have access or rights to a community or identity. An example would be an exchange something like: “Oh, I like Pokémon too!” “Really??? Well, if you really like Pokémon, then what’s the third evolution of Sandile?” Gatekeeping can also be an attitude that if someone doesn’t use the “nice” tools or the “right” tools, then they’re not a “real” maker.
Here at Loops of Gray, I totally reject gatekeeping. The maker community is exactly that, a community. And the goal should be to get more people interesting in making. It’s not an elite group where only the experience people are allowed to be. People of all skill levels and who have whatever resources available are makers if they want to call themselves makers.
I don’t care what sort of knitting needles or yarn you are using. Are you having fun knitting? Awesome, come join us. Only make t-shirt quilts and are intimidating by fancy piecing? Don’t care, you’re a quilter. Only have access to a 3D printer at a Makerspace and don’t have your own one? Welcome to the 3D printing community.
There is always room for more makers and I strive to always be welcoming and encouraging to everyone who wants to try new things.
Shawl pattern is Dohne by Gretha Mensen

Ravelry is the absolute go-to website for knitters and crochet-ers. It is mainly a database of downloadable patterns (both free and paid) and yarn brands, but it is also a great way to keep track of your projects and connect with other crafters.
If someone asks me “can you make this?”, my first stop is Ravelry. There will almost certainly be something either exactly or at least similar. I can also filter on what type of yarn I have in my stash to find a pattern that might go with what I have on hand. You can also see all the projects I’ve made and kept track of since I joined in Dec 2007 - over 500 projects!
It’s also a way that I can sell my patterns. I’ve got 6 patterns available, 3 for free and 3 for sale. I hope you check them out!
Cowl pattern is Fade Me, Seymour by Ann Konzen.


These are the glues and tapes I keep in my shop at all times. My #1 go-to is cyanoacrylate glue, also known as super glue, krazy glue, or just CA glue. It’s perfect for 3D printing and foam board and even small wood projects. I recommend getting a kicker so that it sets even faster.
Top row from left:
hot glue - The OG glue of making. I just keep a small one because my space is tight.
rubber cement - This is perfect for paper. I used it most often when making my own envelopes for cards during COVID.
wood glue - I don’t do a ton of things with wood, but it obviously comes in handy.
Middle row from left:
Elmer’s glue - Basic stuff to use for whatever.
two-part epoxy - For when things get serious. I’ll use this for 3D prints or plastic bits that absolutely need to hold together and be strong.
CA glue - <3
washable glue stick - This is used most for sewing to glue baste seams or for English paper piecing.
Bottom row from left:
Scotch tape - Nothing fancy, but I did steal the slick dispenser from a previous job.
packing tape - For mailing packages.
painters tape - This is used in 3D printing to aid in bed adhesion. I used to use it a lot more on a previous printer, but my current one doesn’t need it as much.
Shawl pattern is Parquet Tiles by Rose Beck

As Adam Savage has said, “cardboard is a gateway drug to making.” It’s generally free (buying online = near infinite cardboard boxes), easy to cut, and easy to adhere together. You can quickly prototype anything and learn how you might make adjustments for your next iteration.
In about 45 minutes, I put together this prototype display stand using nothing but the box my sewing machine came in, a box cutter, a ruler, a pencil, and some packing tape. Even with simple materials, you can turn your ideas into reality.
What I learned from the prototype is that the shelves could benefit from a little lip around it, so for my foam board version, I’m going to recess the shelves down into the upright bits a little bit, maybe about an inch. The packing tape is only just holding it together, so I can easily cut it apart and use it as a template for the next version.
Cowl pattern is Contentment Cowl by Michelle Krause.

Everyone hates rework. Having to undo a bunch of work to fix a stupid mistake can be so frustrating. There’s always the questions of “Will anyone notice?” “Will it bother me later?” “ How much of it do I have to redo?” Add to that the feeling that you have wasted time by doing it the wrong way, then taking it out, then doing it the right away again.
When I’m knitting and I find a mistake I made a ways back, I will almost always rip it out and redo it. I would much rather spend the effort now in order to have a better finished product. Even if it takes longer, it will be worth it to me to have the item looking professional and neat.
3D printing is a great example of intentional rework. I may not always know it will turn out right the first time, but I print it anyway, learn from the mistakes, and make another one. This sort of iterative design is more of a learning process than truly throwing time away.
What do you think about rework? Is it frustrating? How big of a mistake does it have to be before you fix it?
Shawl pattern is Bermuda Scarf by Ilga Leja

I’ve got 2 decently sized windows in my studio and some overhead lighting, but sometimes I need something a little more focused. And of course, I often craft when it’s dark. Adding task lighting, especially the one over my cutting mat, was one of the best studio upgrades I made in the last year.
The cutting mat lamp clamps on to the table and is fairly adjustable. It can do multiple brightness levels, but more importantly, it can do either cool/blue light or warm/yellow light. This makes it great for taking photos when the ambient lighting isn’t great.
The small desk lamp is relatively new, but I used it mainly when I am doing some hand sewing or weaving in ends at my desk. My desk is the furthest away from the other lighting sources and sometimes I need something super focused on what I’m doing. It’s cordless/rechargeable and can do 3 different brightness levels.

Today I want to give a shout out to fellow STL maker Green Rock Sewing! Rachel makes embroidered towels, bags, and pillows, beautiful napkins and paper-less paper towels, plus she offers sewing repair services.
I own several of her towels plus I use her bee pouch to hold my fancy brush pens. I totally need some paperless towels and I kind of regret not getting some when I saw her today at the Tower Grove Farmer’s Market.
I highly recommend all of her products and if you ever need some sewing repair, she is your gal!
Cowl pattern is Hot Lines by Lorraine Waitman

Crochet, like knitting, uses a lot of specific words and phrases, so here’s a round up of some of the common ones you might see or hear.
chain - this “stitch” is simply bringing your yarn over your hook and through the loop. It’s most often used to start your crochet project
single crochet - this stitch is the shortest and most dense stitch. It’s most often used for amigurumi/plushies since the stuffing won’t poke through
amigurumi - this is a Japanese word that means “crocheted or knitted stuffed toy.” These are often small plushies with cute features, but can be really anything. Examples of amigurumi are under the plushies section of my shop.
double crochet - this stitch is probably the most common and would likely be what you see on older afghans
granny square - this is a really common technique to make simple blankets or potholders that combines double crochet and chain stitches to make an easy-to-memorize pattern that works quickly.
magic ring - this is a technique to start your work in a circle that creates a seamless starting hole
Shawl pattern is Endless Winter Shawl by Stitch With Passion

Getting gifts for makers can be tough. They often already have everything they need or what they do need is really specific and it can be hard to buy the right thing. So this week I’ll be offering my tips for what to get (and not to get!). First up: knitters and crocheters.
Shawl Pattern is Love & Darkness by Sylvia McFadden

Sewists and quilters have no lack of notions and goodies that they use and need.
I would generally avoid purchasing fabric for them because they likely already have plenty or might be particular about what they buy, but if there’s a particular bundle or specialty fabric you think they might like, go ahead.
Cowl pattern is a simple farmer’s rib/seeded rib stitch in the round. Cast on 160 stitches with DK weight and work 60 rows of:
Row 1: (k3, p1) around
Row 2: p1, (k1, p3) until 3 stitches are left, k1, p2.
The colors represent my and my sisters’ birthstone colors and I made coordinating cowls for each of them where their birthstone color is in the middle. Inspired by the Family Tree Cowl by Dana Rae Makes.

In addition to more “traditional” hand crafts like knitting and quilting, I also do a bunch of general making. I can cut and glue up my own custom foam board display stands. I can make envelopes, I can cut a foam chair cushion, I can make pincushions, I can take apart a ceiling fan. There are all sorts of makers out there who love to be creative, try new things, and support other makers.
Shawl pattern is Wild Prairie by Kalurah Hudson

Here at Loops of Gray, I try to be as much of a mental health advocate as I can. I’ve got a ton of resources on my site and I’m always willing to talk and share about mental health with the hopes of reducing stigma and encouraging people to share their own stories.
Giving a gift for someone who might be struggling with their mental health can be tricky. They might not be open about their struggles, so you want to take care to be supportive without calling attention to it. You also want to avoid being preachy and overly helpful. It’s good to focus on general items that are helpful to anyone, but especially to someone who might be having a mental health concern.
Shawl pattern is Moonlight Sonata by Shui Kuen Kozinski

The maker in your life may not need anything specific to their craft, but they are sure to appreciate thoughtful gifts from other makers. Here are some general suggestions for wonderful and delightful things that makers (or anyone!) will enjoy.
Scarf pattern is Patch by HandWorks Knitwear Designs

Yarn comes in 8 official “weights” which refers to how thick around the yarn is. It ranges from size 0 to 7. The most common beginner weight is 4, which is also called medium or worsted weight. Another common weight is 1, also called super fine or fingering weight, which is used most often for socks and light shawls.
There can be a lot of variation within the weights. Something rated a 4 might be on lighter side and knit up more like a 3 depending on your pattern and needles. The weights are useful guidelines, but you also have to take into account what you are making and how you want the finished product to feel.
Not pictured is 0 (lace weight) which is closer to a thick thread rather than yarn and 7 (jumbo) which is commonly used for big thick fuzzy blankets.
Cowl pattern is Double Knit Kraken Cowl by Kraftling using worsted weight yarn

Traditionally in sewing, pins are used to hold pieces together temporarily before they are sewn together. Nowadays, clips are gaining in popularity as an alternative to pins. Both are great and each have their advantages and disadvantages.
Pins can be sewn over and left in the work until the sewing is complete, whereas clips have to be removed before you sew that section. Clips obviously don’t have anything sharp that could poke you and they also don’t leave holes in your fabric. Pins can be more accurate than clips, especially when you need to match your seams or join specific points up in foundation paper piecing. Clips only really work best on the edges of a fabric, where a pin you can put anywhere. Pins can be hard to use on thicker fabrics like fleece. Pins are cheap and take up less space.
I have both in my studio and use the one that is better suited for the task. Pictured are Clover Wonder Clips and Iris superfine pins. Do you have a preference for pins vs clips?
Cowl pattern is Aurora Polaris Cowl by Lou Lachance.

Today I want to give a shout-out to my friend Megan who runs Urban Owl out in Kansas City. She makes awesome and hilarious doormats plus a portion of all sales go to a local animal rescue. She also fosters dogs including this beautiful Mabel who is available for adoption!
Cowl pattern is Crusher Cowl by Lattes & Llamas


Most sewing machines comes with interchangeable feet. This allows you to use the best or more specific tool for the job. There are a lot of different ones out there, but here are the 5 I use most often.
General purpose foot: This is used for straight or zig zag seams and can handle most jobs.
1/4" piecing foot: This has an edge at 1/4" from the needle, so it's used as a guide for most piecing for quilts.
Zipper foot: The narrow width allows you to get close to the zipper without going over it.
Free motion foot: This foot is best for free motion quilting where you move the quilt with your hands instead of using the feed dogs like with traditional seams.
Walking foot: This foot has feed dogs on the top that pair with the bottom feed dogs so that the quilt sandwich moves more evenly through the machine. This is also helpful for thicker fabrics and bags.
Shawl pattern is Stripe Study Shawl by Veera Välimäki

Trello is the main way I keep track of all my Loops of Gray projects. I put things in various lists and move them along as they progress as well as manage their priority.
There’s a list of projects that are just in the idea phase that haven’t been fleshed out in more details. They’re mostly stuff I might get around to eventually or I need to think more about. Next is the backlog which are projects in progress, but aren’t actively being worked for some reason.
The bulk of the organization is in the Accepted list. These are projects that I have agreed to make for someone (and sometimes myself) or projects that I know I want to make in the near future. The higher on the list, the higher priority and if there is a due date, I will add that to the card as well.
The in progress and done lists are pretty straightforward. It always feels good moving something in progress to done. :) My board is public, so feel free to check out what’s in the queue!
Shawl pattern is Baby Sunshine by Kelly van Niekerk

It's been a crazy year and I am so thankful that the vaccine has allowed us to hang out in person again. I've met a ton of new crafting people and it's been really inspiring and motivating.
I am thankful for a stable life situation that allows me to make and hustle and help solve people's crafty problems with creativity. I love bringing their visions to life with my hands.
I hope you all have a wonderful day with family and friends, whether in-person or virtual, sharing a meal, stories, gratitude and hope.
Shawl pattern is Wavedeck by Kate Atherly

Prepping for a market is always stressful. Making sure you are bringing everything is a huge concern. Have to remember my card reader, business cards, Venmo signs, table signs, big sign, Loops of Gray mask and vendor apron. My day-of emergency kit always includes extra labels, markers, white-out, things to attach the labels to the item, binder clips, scissors, and zip-ties. I did forget my packing tape this time, but that's usually in the tubs too. I also didn't bring enough hangers, so I had to get creative with a few shawls. :)
Shawl pattern is Damask by Kitman Figueroa

Supporting small businesses is so important. No one at a big box store cares if you bought something except maybe a handful of execs. Buying something from a small business 100% makes a person happy. It puts food on the table. It helps them to continue to be creative and successful.
When you buy from a small business, an actual person does a happy dance.
Shawl pattern is Rum and Cola by Boo Knits

I don’t have a crafty tip today because I mostly just want to thank everyone who came to the Das Bevo Holiday Market this weekend. I met a bunch of new people, spread the word about my learn to knit/crochet class, and most excitedly, I more than doubled my previous sales record for a weekend.
As a result, Loops of Gray was able to donate $100 to the American Foundation for Suicide Prevention. As you know, mental health is an important issue for me, so I’m super proud to be able to support the AFSP with their goals to prevent suicide and help those affected by suicide.
Cowl pattern is Queer Pride Flag Cowls by Claire Crawford & Jocelyn Tunney. Kit is from O-Wool.

Pencils are a must in any maker’s shop. I love getting ones with funny sayings on them, especially the Kamala Harris set from Pensults (sadly, no longer in production). But equally important are good accessories. We all know the erasers on the pencils are crap, so I go with a standalone eraser. I have a classic Milan pink eraser as well as a kneaded eraser (brand unknown, purchased at Artmart). My favorite pencil sharpener is the Prismacolor Scholar sharpener, which is also great for colored pencils. Bonus points for grid paper notebooks!
Cowl pattern is Winterlong by Bristol Ivy

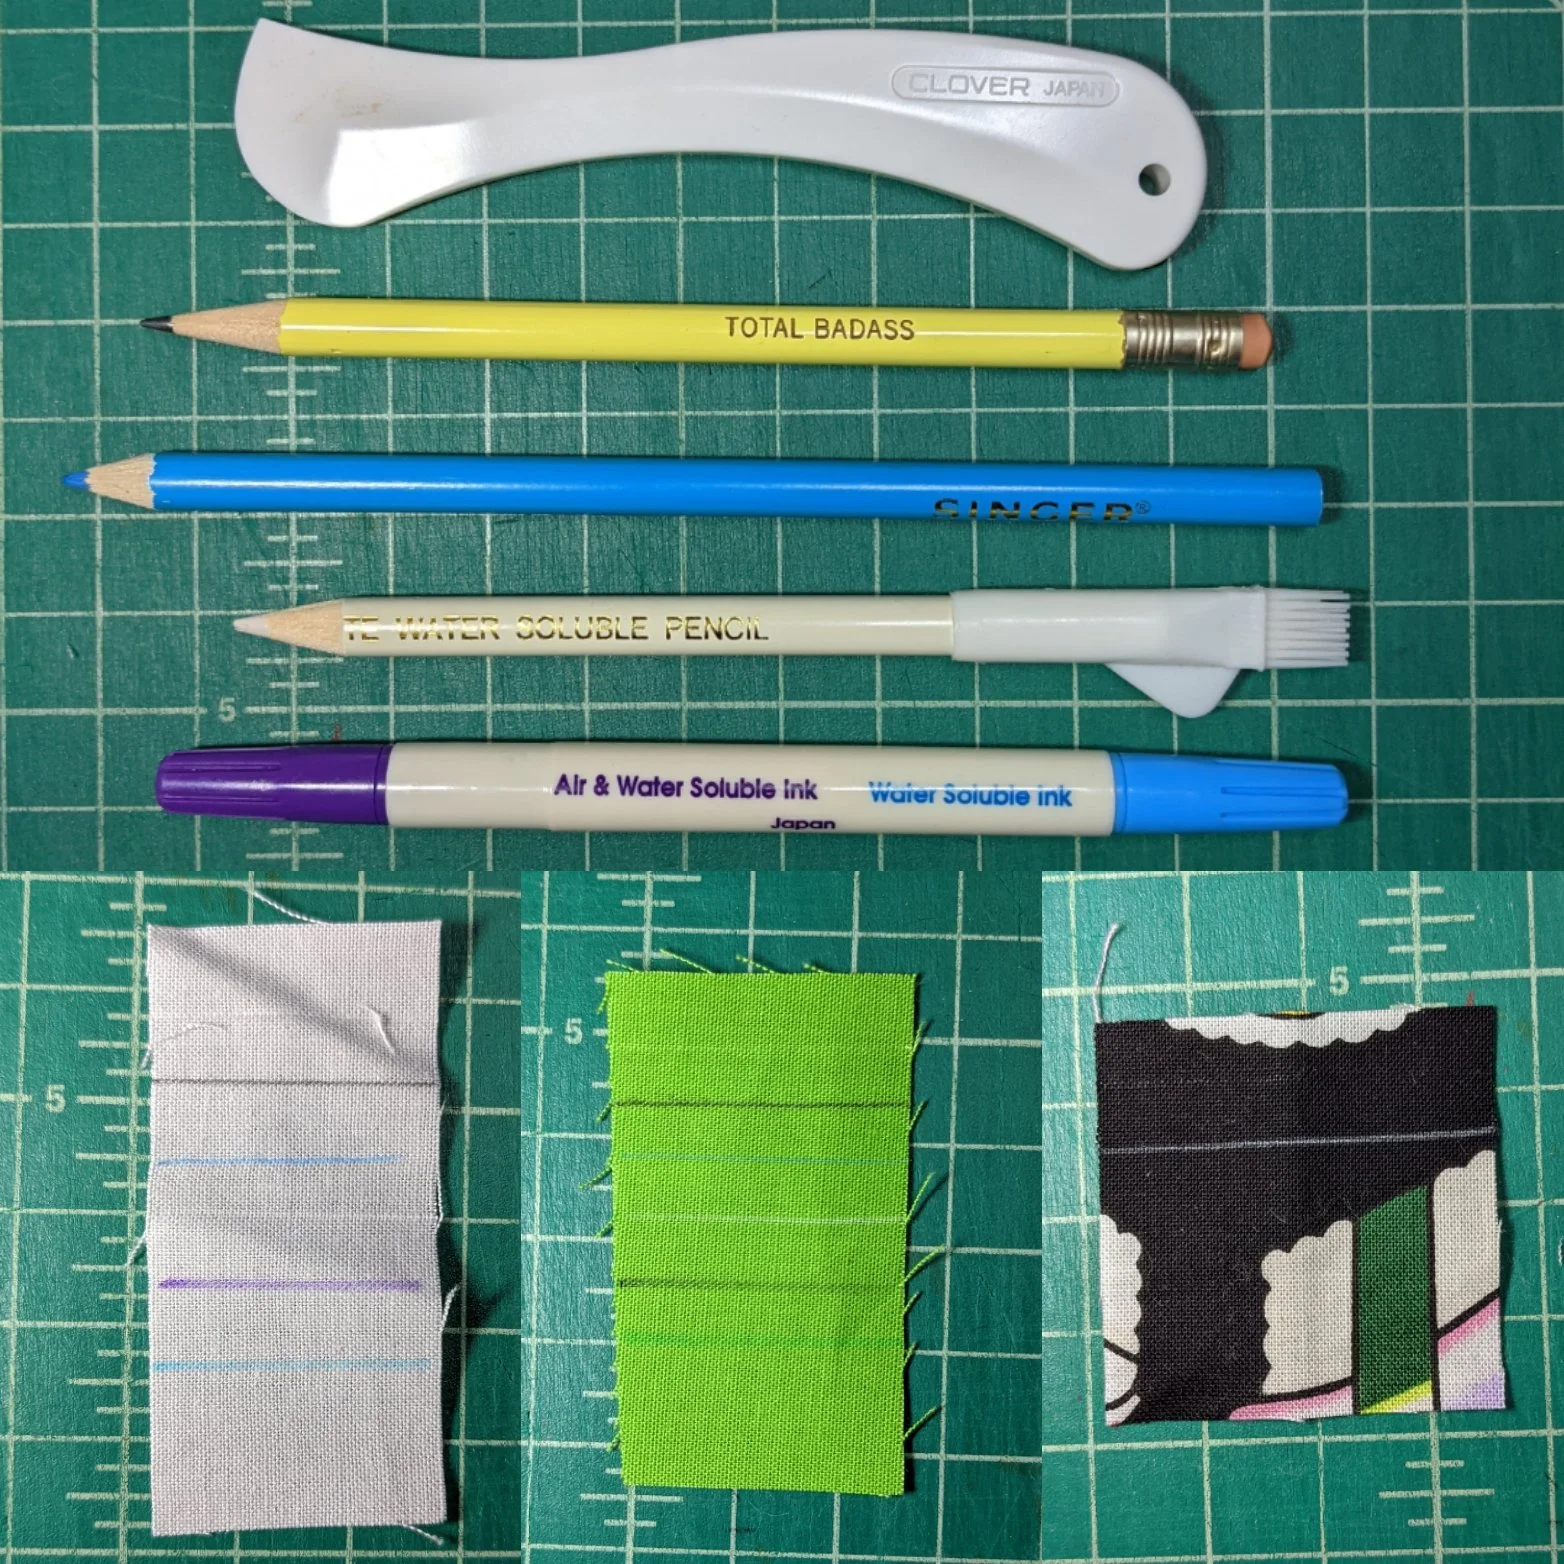
There are a few different tools I use to mark fabric, which have varying levels of success on different colors of fabric.
From top to bottom:
Hera fabric marker
Regular pencil
Blue water soluble pencil (I actually don’t use this one, but I did find it in my kit)
White water soluble pencil
Disappearing ink fabric marker, both air and water soluble
The Hera marker doesn’t use ink, it more creases the fabric and sort of presses it down to make a little bit of a shiny line. It shows up fairly well on all 3 shades of fabric, and it is easier to see in person rather than in the photo.
A regular pencil works great, but it is not removable. This works better for things like cut lines rather than sew lines.
The white pencil is pretty much the only thing that will work on black fabrics other than the Hera. This version is water soluble, which means it will come off with spray or a steam iron.
The disappearing ink marker has 2 modes. The purple is both air and water soluble, which means that while water will work, it will also just disappear over time, which can be a huge problem. The blue side works similarly to the white or blue pencils.
Shawl pattern is Be Confident by Hanna Maciejewska

A knit stitch is not a square. It is slightly wider than it is tall. As a result, if you want to design your own charts, you have to use special knitting graph paper. If you use regular paper to design the chart, then knit from that, your design will end up looking too short.
In the example, the heart looks correct on the regular paper, but coloring in the same squares on the knitting paper makes it look squashed. This is also why you can’t use cross stitch patterns for knitting because those are squares as well.
There are websites that have knitting graph paper you can print at home or there are sites that help you make a chart like Chart Minder, which integrates with Ravelry.
Cowl pattern is Mulder by Hayley Geary

For most of my plushies, when I want to add eyes, I use a product called safety eyes. They are made of plastic and have a post on the back that goes through your item. Then there is another plastic-y/rubbery pieces that slides over the post such that it is a one-way operation. The only way to remove the eye from your item would be to cut the rubber piece off the back. This makes the eyes very safe for plushies made for kids, as the eyes are unlikely to be ripped off and swallowed.
As you can see, I have many colors and sizes (although currently out of 7mm eyes!) that I keep in custom 3D printed drawers. I try to always keep some on hand because I do love making cute plushies with faces. :)
Cowl pattern is Dragon Wing Cowl by Jessie Rayot.

Our house goes through a LOT of candles. Our current favorites are from Gingersnapped Candles.
PROS:
BIG smell - no wimpy scents here
Clean burning - no smoke/soot
Wick comes pre-trimmed
Queer WOC-owned
Reasonably priced
Seasonal scents
CONS:
They often sell out of scents because they are so popular!
They’ve got tons of events coming up, so make sure to check them out or shop online!
Cowl pattern is Purl Ridge Scarf by Stephen West.

have been a maker for a long time. I learned to knit when I was 12 and I made my first quilt when I was 16. Throughout my childhood, my mom always made sure there was always a new craft or skill to learn. We did origami, we played with K’Nex, there were Perler beads, we did loom weaving, we made friendship bracelets, we tried calligraphy, I made accessories for my American Girl dolls. And there was so much hot glue.
Being exposed to a lot of different crafts has really shaped me into the maker I am today. I can tackle nearly any project with the broad skillset I’ve developed over the years. I was always encouraged to try something new and it gave me the confidence to try new things even today. Two-color brioche knitting? Never done anything like it before, but it can’t be that hard. Sewing with vinyl fabric? Sure, why not. Hey, can you make <insert weird thing here>? Well, probably!
Cowl pattern is Millwater by Beth Kling

There are several ways to finish the binding on quilts, but this is how I do it. I use single fold bias tape (more on bias tape in a future post!) and machine sew it to the front side of the quilt, lining up the raw edges. I then fold the folded edge over to the back and use a ladder stitch to finish it by hand. This makes an invisible seam on the back so everything looks nice and neat.
Shawl pattern is Triangulines by Nim Teasdale

Fabric for quilting obviously comes in yards, typically 40-44” wide and cut from a long bolt of fabric. But that can get pricey if you want a larger variety of fabrics in smaller sizes. There are various precuts available, which are yardages of fabric cut into standard sizes and typically bundled up in a kit. Often designers put together a kit with coordinating fabrics, so you don’t have to pick out all the fabrics yourself.
Common precut sizes:
Mini Charm - 2 1/2” squares
Charm - 5” squares
Jelly Roll - 2 1/2” strips that are each width of fabric
Jolly Bar - 5” x 10” rectangles
Layer Cake - 10” square
Fat Eighth Bundle - 9” x 21” rectangles
Fat Quarter Bundle - 18” x 21” rectangles
Half Yard Bundle - 18” x width of fabric rectangles
Pictured: top - fat quarter bundle, bottom left - mini charm, bottom right - jelly roll
Shawl pattern is Light in Shadows by Milja Uimonen

There are a lot of different products out there to make fabric stiffer or have different properties. They are often used in bag making or things like fabric baskets. Many are fusible, which means you can iron them on to the main fabric and they sort of glue together, while other ones are sew-in, which you have to manually attach to the main fabric via sewing. Here are the ones I have in my shop:
SF101 - This is my main stabilizer for cotton fabrics. It adds just a little bit of heft while keeping the fabric flexible.
987F - This adds a little more structure to bags without it being completely stiff. It’s almost like fusing a piece of batting to the fabric.
808 Craft Fuse - This creates a fabric that is sort of like fabric-y cardstock. You can flex it and bend it, but it generally stands on its own.
70/71F - I have both the fusible (71F) and non-fusible/sew-in (70) versions of this. It’s the heavy duty stuff most often used for the bottom of bags or sides of a basket.
Flex-Foam - This is mostly used for bags and I don’t use it a ton. There is a fusible version of this, but I haven’t tried it.
Isul-Bright - This is basically batting with a thin metallic layer in the middle. It’s used for insulating things like totes, lunch bags, and casserole dish covers.
805 Wonder Under - Not an interfacing per se, but it fuses fabric to other fabric without adding much stiffness. Most often used for applique. It comes with a paper backing, so you fuse the one side to the fabric, peel the paper off, then fuse that new fabric+Wonder Under to another piece of fabric.
Shawl pattern is Schwarm by Hanna Maciejewska

I have a few confessions to make.
I had been making my yarn overs “wrong” for over 20 years and mostly still do
I have done a gauge swatch like 2 times ever
I have never used a soldering iron
I don’t like using a longarm quilting machine
I don’t bury my threads when quilting. I didn’t even know what that meant until a couple years ago.
I never prewash my fabric
I don’t know what the different weights of thread mean and why to use different ones
I hate making t-shirt quilts
Anyone want to share any of their maker confessions?
Cowl pattern is Black Light by Shaina Bilow

Tested does a series at the end of the year where everyone shares their favorite things they’ve gotten or used in the last year. I really like the series, so here is my list of my favorite things for 2021.
Number 1 is obviously my new sewing machine. It was a long deserved upgrade and I’m in love. It does so many nice little things and has so many features I haven’t explored yet.
Next is this seam ripper from Orbt. It feels so nice in your hand and makes ripping seams a much more pleasant experience. It feels so luxurious and I highly recommend it to every sewist.
The next 2 items were some great shop infrastructure upgrades that have seriously improved my studio. The clamp-on adjustable LED lamp has added a ton of task lighting to my cutting table and it’s non-intrusive. The cutting table is now also a little taller thanks to the furniture risers I added. It puts the table at a better cutting height plus I can now fit extra shelves underneath.
While I was between sewing machines, City Sewing Room saved my butt and allowed me to keep sewing on projects that had a deadline. I’ve since fallen in love and regularly stop in. It’s so much fun and it’s been great to meet a bunch of fellow sewists.
My last favorite thing of this year is the mental health quilt I made, titled Okay To Talk. The project really means a lot to me and I was glad to display it at the AFSP Out of the Darkness Walk in September. More details are in this Instagram post.
Shawl pattern is Cicada Shawl by Toby Roxane Barna.

The supplies needed to start knitting are relatively simple: yarn and knitting needles. However, how do you know what needles to pick? There are so many options out there and it can be hard to know what will work for you. I’ve got a few basic concepts to consider that will help you decide what to buy.
The first main question is: What do you want to knit? If you are more likely to knit things like scarves or dishcloths or headbands, then straight needles are a good fit. If you are more likely to knit hats or blankets or socks, then circular needles would work better.
The next question is about grip. Bamboo needles offer a little more grip and the stitches are less likely to slip off, but metal needles are generally provide a faster knitting speed. This one is massively up to personal preference, but I recommend that beginners start with a bamboo needle for the first session and then make their decision from there.
As far as size goes, for beginners I will always recommend a US 7. The most common yarn weight is worsted weight and US 7 is a good match for that weight. You may find out over time that for worsted weight a US 6 or 8 is better for you, but you won’t necessarily know that right away.
If you decide that a circular needle is the way to go, the length is pretty straightforward. For hats, you will want a 16” circular needle. It also functions similarly to a set of straight needles in a pinch. For blankets or larger wraps or shawls, a 40” length is a good option.
Regarding brands, a lot of that is up to your personal budget and preference. I personally use a Chiaogoo interchangeable set, but I also own a couple Clover needles and have used Knit Picks needles extensively in the past.
There are a few more considerations to take into account, such as double pointed needles and the magic loop technique, but that will be saved for an “adventurous beginner” discussion.
Shawl pattern is Lisette by Libby Jonson.

I went to the St. Louis Modern Quilt Guild meeting for the first time in a long time, partly due to COVID and partly due to other bits of life getting in the way, and it was sooo good. It feels amazing to connect with other people who share the same hobbies and activities and bits of nerdom that you do.
Meeting new people and catching up with old friends feeds the soul. Humans want to connect to other humans. Feeling part of a community is incredibly important and I’m so glad that there are ways to be around other awesome makers and crafters here in St. Louis.
Cowl pattern is Undertone by Tin Can Knits. Multicolored yarn is from Alpacas of Troy.

In making, there are often 2 schools of thought: Are you a “process maker” or are you a “product maker”? A process maker is more likely to enjoy the act of making and the “doing” of the thing, while a product maker is more interesting in having the thing at the end. Both are totally valid approaches, just different ways of looking at it.
I tend to consider myself a “process maker.” I make things because I like making things, not because I am necessarily looking for a particular end product. I make things that I think are interesting or use a new skill or solve a problem in a clever way. If at the end, the thing ends up not very useful, that’s fine, it was fun along the way.
I use knitting as a thing to do with my hands while I am watching YouTube, not always because I want a specific hat or object. It’s also one of the reasons I like making weird commissions. It’s more about solving the problem and figuring out how to make the weird request instead of just having a thing.
If you are a maker, how do you approach making?
Cowl pattern is Valin by Marlene Berghout

Today I want to give a shout out to one of my favorite quilt designers, Sheri of Whole Circle Studio. She designs using mostly foundation paper piecing and I love her use of bold colors and fun lines and textures. I participated in her Around the World Block of the Month club this year and she’s got another BOM club slated for next year: Botanical Beauties. I also really love her “Big Island” series using simple templates and shapes to create a wide variety of quilt designs.
Shawl pattern is Krobus by Sylvia McFadden.

A quilt consists of 5 main parts:
quilt top, pieced or whole cloth
batting, to give thickness and body to the quilt
backing, generally left as plain fabric
quilting, to secure the quilt sandwich together
binding, to finish off the raw edges of the quilt
In the example, you can see the paw print fabric representing the top. In this case, it is a whole cloth piece, but this is often complex and consists of multiple blocks or pieces sewn together in a cohesive design. The batting in the middle is typically cotton or a cotton/polyester blend, and then the backing (solid brown in the example) finishes off the quilt sandwich.
I quilted the pieces together with a simple square spiral. The quilting can be as simple or as complex as you want. This is a way to be really creative in highlighting parts of the pieces or just giving the quilt an overall design to tie things together.
Most quilts are finished with some sort of binding, which I didn’t do in the example, but it’s a simple way to cover the raw edges and complete the project.
Shawl pattern is 22 Little Clouds by Martina Behm

I learned to knit almost 25 years ago from a book at my grandma’s house, Teach Yourself to Knit the Easy Columbia Minerva Way. This was way before YouTube, before even how-to DVDs, so everything was in a book. Each step was illustrated, not even photographed. I still have the book and it holds a very special place in my heart.
It’s actually a really great book to learn to knit from. I brought it today when I was teaching a learn to knit (and crochet!) class at City Sewing Room and it definitely helped illustrate some concepts that I had trouble articulating. There are even a few copies still available via Amazon and eBay!
Nowadays there are so many online classes and videos on YouTube, but sometimes being able to read a book and go at your own pace is really helpful.
Shawl pattern is Sunshine and Shadows by Evelyn A. Clark. I knit this shawl for my wedding and it’s one of my favorite shawls and I still wear it all the time. :)

Learning to read a knitting chart can be tricky. There is usually a legend that tells you what the symbol in each square is representing. There are some common conventions, but once you figure out how that particular chart works, it can be easier to visualize what is happening in your knitting.
Charts are also used as a sort of shortcut when giving instructions. More experienced knitters can often just look at a chart and figure out what is happening, without needing specific step by step instructions.
In this mini hat ornament I am knitting, the instructions are sparse and most of the work is done from the chart. If I were to write out the chart in common written instructions, this is what it would look like:
Round 1: (p2, k1tbl, p4, k1tbl) x6
Round 2: (p2, k1tbl, p4, k1tbl) x6
Round 3: (p2, k1tbl, p3, sl1 to cable needle, hold in back, k1tbl, k1tbl from cable needle) x6
Round 4: (p2, k1tbl, p2, sl1 to cable needle, hold in back, k1tbl, p1 from cable needle, k1tbl) x6
Round 5: (p2, k1tbl, p1, sl1 to cable needle, hold in back, k1tbl, p1 from cable needle, p1, k1tbl) x6
Round 6: (p2, k1tbl, sl1 to cable needle, hold in back, k1tbl, p1 from cable needle, p2, k1tbl) x6
Round 7: (p2, sl1 to cable needle, hold in back, k1tbl, p1 from cable needle, p3, k1tbl) x6
Work rounds 1-7 an additional 2 times (3 times total)
Round 8: (p2, k1tbl, p4, k1tbl) x6
Round 9: (p2, k1tbl, p4, sl1 as if to purl. remount the next st so it is rotated 180 deg clockwise. return the slipped st to the left needle, k2tog) x6 [side note: the math doesn’t actually work out for this round, so I skipped this round]
Round 10: (p2, k1tbl, p3, right-leaning twisted decrease) x6
Round 11: (p2, k1tbl, p2, right-leaning twisted decrease)) x6
Round 12: (p2, k1tbl, p1, right-leaning twisted decrease)) x6
Round 13: (p2, k1tbl, right-leaning twisted decrease)) x6
Round 14: (p2, right-leaning twisted decrease)) x6
Round 15: (p1, right-leaning twisted decrease)) x6
Round 16: (right-leaning twisted decrease)) x6
As you can see, it takes up a lot more space in a booklet or PDF than the relatively straightforward chart. However, some people work better from a chart and some people work better from written instructions. Which do you prefer?
Shawl pattern is Wonder Woman Wrap by Carissa Browning

A maker’s mark is more than just a bourbon. :P More commonly known today as a trademark or even just a logo, a maker’s mark is used to indicate the manufacturer or maker of a specific object. They’ve been used by makers for a loooong time, especially as related to pottery.
You can also find maker’s marks on furniture, leather goods, jewelry, and more. Quilters often add labels or quilt a distinct element into the design. There’s not really a great way to add a maker’s mark to knitting or crochet though. Maybe a couple stitches in your signature color?
Scarf pattern is Blue Bell Hill Scarf by Jocelyn Tunney

Sometimes in making, we make “mistakes.” Something doesn’t turn out like we wanted or we skipped a step or did a knit instead of a purl. A lot of us makers would consider these mistakes, but they don’t always have to be. Angela Walters likes to refer to these occurrences as “unintentional customizations.”
Maybe it didn’t turn out like the pattern, but it still ends up looking cool. I bet the person you’re making it for doesn’t know what it was “supposed” to look like and has no idea you did it “wrong.” It’s still cool and they’ll still love it.
Maybe you added a flower and you were supposed to add a swirl. Well, if you add a few more flowers, it becomes a design element and it will look intentional.
It’s important to remember to be graceful with yourself and go with the flow. Sometimes it’s needed to go back and redo it, but sometimes the “mistake” can turn into something cool you didn’t even mean to do.
Shawl pattern is Quaking Aspen by Dee O’Keefe

Sewing machine needles, pins, and hand sewing needles all get dull, sticky, or broken at some point and need to be thrown out. But how do you do it safely?
It’s obviously not good to just throw needles straight into a trash can. There’s always a possibility that someone along the line between you and the landfill will encounter the trash with their hands. Accidentally needle sticks are treated very seriously, so I try my best to mitigate that situation ahead of time.
My process is to use a piece of scrap foam board that you can get at a craft store or even Target. I label it TRASH for my own identification and just stick the needles in there when they are done. It’s sturdy enough that the needles don’t poke through and it’s a material I always have on hand.
Scarf pattern is Bevel by Jared Flood.

There are many ways to make a slip knot, but here is the way I learned.
Shawl pattern is Shaelyn by Leila Raven

I get asked all the time when people are wanting to start either knitting or crochet: Which is easier?
Well, it depends.
The actual first question you need to consider is what sort of items do you want to make? Some things are more easily made via crochet and some are more easily made via knitting. Cute little plushies for example, are way easier with crochet, so if that’s what you want to end up with, then crochet would be better for you. Something like a hat or scarf could be done with either craft. Sweaters and socks are better suited for knitting.
Knitting has a couple distinct disadvantages:
Casting on is super annoying at first. It’s hard to explain and it’s hard to get your head around. There’s a lot going on with the yarn and it’s easy to get discouraged. I really haven’t figured out a way to get past that, so I’m open to suggestions.
Dropping a stitch can cause a lot of problems. The work can unravel and it can be hard to rescue it.
Crochet, on the other hand, has some drawbacks as well
Can often look distinctly “home made”, Knitting is more similar to commercially knit products, so it can look a little more “polished.”
Crochet is worked more with your dominant hand, so it’s super difficult for left handers because almost all patterns are written for right handers.
Uses a lot more yarn per finished item. The stitches are a little thicker and use more yarn, which can add bulk to items.
The basic stitches for each craft are pretty similar in difficulty. Reading the patterns can be just as vague (lol) in knitting as in crochet. As to which one is faster, that’s difficult to measure. Yes, I could make a blanket “faster” in crochet vs knitting, but it would be a fundamentally different end product. This also relates to the idea of being a product maker vs. a process maker. It may not matter to you how “fast” something gets done.
There is a lot to consider, so I really don’t want to claim that one craft is easier than the other. One may just make more sense to you than the other. One may bring you joy and the other is super frustrating. Figure out what you like to make and just give it a try.
Shawl pattern is Four Seasons by Alana Dakos.

Today I want to give a shoutout to local maker Koala Pouches. Susanna makes high quality bags of all shapes and sizes. I personally own the Olivia coin pouch (which I use to carry my thread snips and yarn needle while on the go), the Peyton large toiletry bag, and the Kate wristlet. She chooses beautiful fabrics and everything is done extremely professionally.
Her shop is on break until Jan 1st, but all her products are available to browse and drool over. Hope you check it out!
Cowl pattern is Sexy Berlin Cowl by Maren Odenthal.

When I make things, I try to imbue each item with a part of myself. I have thought about every stitch, every cut, every fold. My energy is now a part of the item and a part of myself goes with the item to its new home. To me, that’s one of the reasons that handmade things are so important in general. You’re not just getting an item, you’re also getting the thoughts and care and love of the person who made it.
My hope is that the items I make are used. I want them to be worn, washed, played with, laid on, and most importantly, loved. I offer lifetime repairs for all items I make. If you come to me and say “the tail for the plushie you made is falling off and he’s getting pretty dirty,” I will sew the tail back up and give the plushie a bath. If the seams of a blanket are coming apart, I will fix them. I don’t want the things I make to be treated so preciously that they have to be put away like fine china and never touched.
We’ve reached the end of Shawl Every Day for 2021. I have fewer items than in previous years due to selling a lot and donating a lot to Back @ You. I really enjoyed sharing my crafty knowledge, tool tips, and favorite fellow makers. Hope you learned a few things and had fun checking out all the different shawls I’ve made.
Cowl pattern is Hiberknitting Cowl by Stephen West.